
My raincoat story is about failure and success when learning a new skill. I want to show you that every project does not always work out as planned. Sadly, the banner project did not come out. Many people see all of the success in art while ignoring the failures that are quietly brushed under the rug. I assure you for each success I have had that I have also had many more failures before I got to the point of something wearable. Today, I’ll share all I learned on the banner raincoat project.

The concept was to make something cool out of a couple of banners from the Krohn Conservatory. The banners are thick and double sided. The first thing I did was to separate the layers and look to see what I had enough material for.
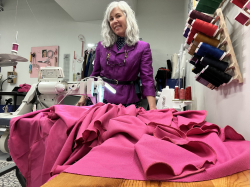
There was enough banner for a simple 1970s raincoat. I hacked Simplicity 7958.


I figured out really fast the plastic banner material was much more malleable when it was heated up outside in the hot sunshine. First red flag!


I cleaned all of my lines, edges and made sure everything matched up on my cutting table.


This project was much like my leather project – wide stitch length, heavy sewing machine needle, tight tension for the stitches, cut with rotary blades and rulers.


I gathered all of my supplies before sewing. I looked on Youtube for any tutorials on sewing banner type vinyl but I couldn’t find anything. I watched videos on sewing clear plastic vinyl hoping for a few tips and what I learned is that it is easier to use bias tape to bind and finish the plastic edges, weights are better than pins for cutting and how to feed it all through your machine so it does not stick. Between these videos and the leather practice I was hopeful of some success.

The biggest new thing I learned was to have a huge empty work area. The sewing machine will not feed through if your project is getting stuck on every little thing.

Just like when working with leather these clips are really handy.

I had places I could not use clips or pins on the material, like the pockets. I tried to use this leather adhesive on the pocket and while it was messy and not perfect it did work. I got my pocket on and it looked great.


Since I knew the hot sun made this banner plastic easy to work with I used my blow dryer to flatten out the seams and flip the pocket flap. All was still good at this point and I thought I was almost finished.

Once I had the sleeves on I was feeling like it was just way to stiff to wear. I was not thinking ahead that it may be way too stiff for even flipping right-side out…
This is where it got crazy. I was almost finished with the banner raincoat project and it was time to flip it right-side out. I was in my studio on the floor trying to pull the sleeve through the arm hole. I was using all of my strength when all of the sudden I heard a HUGE rip! Suddenly, I was down on the floor on my back.

I had to pull so hard that I ripped my line of double stitches out. I got upset, like red hot upset, and scorned the coat, “You are going to be a tote bag!”
I left the half-made coat in the floor like a mangled body waiting on the coroner to proclaim this project dead and went to the Rosewood Art Lunch! I was done.
Behind the scenes~
I have made the second practice raincoat with a German pattern. I was happy to take all the skills I learned from sewing vinyl and apply them to this project. I still had much more problem solving ahead and I will share that process with you next week.

Thank you for reading,
Tracy McElfresh,
Dream it! Sew It!
- A Summer Mini Me Made Handmade Fashion Show - June 26, 2026
- They’re up! Hand-pulled relief prints now at Rosewood Arts Center studio during open hours! Thanks! - June 24, 2026
- Tools To Rip Stitches - June 22, 2026


Leave A Comment
You must be logged in to post a comment.